Code improvements

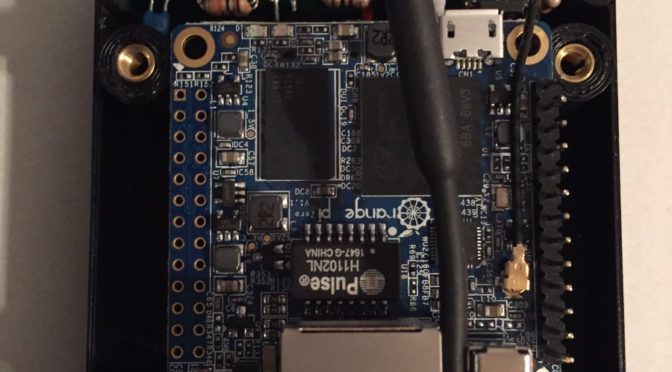
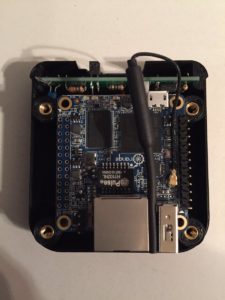
Earlier in 2021 we finally solved some major software stability issues. The C++ code that runs on the Nanopi Neo Air inside the cartridge was crashing relatively often during shooting. Causing loss of captured images.

After long research we found out that this was caused by an imagefile write (the captured image) and an image file read (an image file to monitor the captured result in real time).

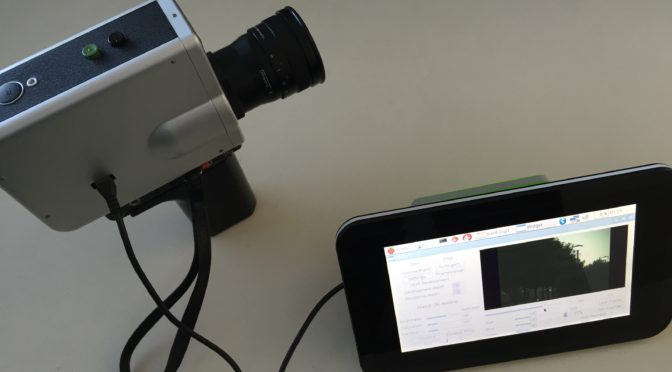
By changing the setup of the system, making the Nanopi run its code from fixed eMMC memory (on board the Nanopi) and writing the RAW files to its separate microSD card we achieve that the monitor files are read off of the eMMC memory while the RAW files are written to the MicroSD. Thus avoiding memory acces issues and subsequent code crashes due to a segmentation fault.

we now feel confident to continue developing the Digital Super8 Cartridge with software that is reliable enough for the user.

Note: the Digital S8 Cartridge runs on C++ code, while it also has its own WiFi accesspoint and webserver on board. This allows users to run our HTML5 app on their iPhone or smartphone to have full cartridge control and monitoring functionality.

Code update: lighter code, monitoring in color

In an effort to improve the code performance we did a lot of weeding out stuff from the DigitalSuper8 cartridge C++ code. We simplified the code quite a bit and also used Mutexes to prevent multiple threads from trying to alter or test certain variables at the same time. Seems that errors have lessened but more testing is required.

New: Color monitoring while filming
Importantly we managed to ‘upgrade’ functionality with color image monitoring while shooting raw images. It used to be B&W for performance purposes.

Safer multi threading and queuing
Also we are using the Qt framework which is a C++ library framework with added functionality such as threadsafe communications between objects. We changed the code so as to send ‘Mat’ arrays that contain the captured images (using OpenCV libraries for that) from one thread to another, that way achieving a safer queuing mechanism as well.

Monitoring explained
As further Information: the Digitalsuper8 cartridge runs it’s own webserver and WiFi accesspoint so that a user can fully control the functions and settings of the cartridge and can monitor the captured frames in real-time through a browser on a smartphone or iPhone.

How this real-time monitoring works:

Next to capturing and storing RAW images from the Ximea subminiature camera and sensor in the cartridge, the cartridge sends image file names for each captured and written frame to the browser via server sent events. The browser uses that file name info to load the image and display it on the smartphone. So the videostreaming solution is actually a frame by frame retrieving of images at 18 fps by the browser, triggered by server sent events

Cleaning the audio heads of Bauer T610 Super8 projector

Here’s a short tutorial on how to clean the magnetic heads of the Bauer T610 Stereo Super8 film projector. This tutorial is also largely applicable to the T502.

Step 1: open the projector by taking off the front cover. Simply by pulling it away.

pulling away the cover

Step 2: Turn the control knob to its ultimate left turn position, the ‘maintenance’ position.

control knob to ultimate left turn position

Step 3: remove light bulb and light bulb holder (to create space to work).

Step 4: It’s smart to cover the sliders with a piece of paper so that screws and small parts cannot fall into the ‘mixer’ part of the projector.

piece of white paper covers the sliders

Step 5: unscrew the clamp of the first magnetic head, which is the ‘erasure’ head. Take it out. Be very careful: when unscrewing the clamp make sure the screws don’t fall into your projector! Also there is a thin sheet of metal that stays behind in the holder of the magnetic head. Just leave it in place. If by chance it comes out together with the head, make sure to put it back in.

viewing the heads from above
removed audio clamp
Dirty magnetic eraser head

Step 6: clean the head with a cotton tip and some cleaning alcohol (spiritus or similar). And put it back in place. Careful to not lose screws.

Clean head

Step 7: unscrew the clamp of the second magnetic head, the recording and playback head. Similar to the first head: take it out and clean it. Be mindful of the thin metal sheet that is inside the head holder.

unscrewing the clamp
The playback and recording head, note the left and right track pick up elements.
Cleaned head
Dirt and iron residue removed

Step 8: After having put back in place the cleaned playback/recording head, repeat the procedure for the third and final head, which is the ‘monitoring’ head. This head is used for monitoring the audio for example ‘live’ when recording audio with the recording head. The sound lags some 4 frames behind.

Finishing up: after cleaning the monitoring head put it back in place. Put the bulb holder and bulb back in place, close the cover and voilà: you have a Bauer projector with clean heads, able to record and playback crisp

Smartphone App for Digital Super8

So we’re working hard on the Digital Super8 app for smartphones. To fully control the Digital Super8 cartridge and all settings. To provide monitoring while filming as well as when doing trial shots without actual recording. And to allow viewing the footage you shot.

The Digital Super8 cartridge sets up its own WiFi access point for your smartphone to connect to and then through the app you fully take control, while you’ve got the cartridge slid into your Super8 camera.

At this time we’re ironing out some minor challenges to increase the performance of the monitoring and viewing of captured shots. Using multi-threading to ensure that the RAW images get displayed in full color and smoothly.

Stay tuned.

NanoPi Neo Air in Digital Super 8 Cartridge

We managed to port our Digital Super 8 code to the NanoPi Neo Air. Using Qt and Qt Creator for platform independent development this wasn’t such a big task, fortunately. Also we managed to get the NanoPi Neo Air to boot up, set up a Wifi access point (SSID: DigitalSuper8 :-)), and to start VNCserver which allows a user to view the desktop of the NanoPi in a smartphone or IPhone. Also the Digital Super 8 control and monitor application is started and can then be viewed via WiFi on the smartphone.
That’s actually quite cool!
Having the NanoPi Neo Air act as a WiFi accesspoint, while running the Armbian OS on it was the most complex task and we had to re-write some scripts to nail it.
Now we are waiting for the new 3D printed cartridge to arrive. It is designed and printed by Dutch 3D print company http://www.partsondemand.eu. The new cart will allow build in of NanoPi, sensor and trigger synch circuit board, LiPo battery (1200 mAh), and charger/booster circuit. The device will have status LED, microUSB charger port, USB port for copying captured images to USB stick, microSD port for option to exchange microSD with updated image.
The device boots from and runs on 32GB eMMC, which enables the fastest RAW image writing and performance.

Parts list of the digital super-8 cartridge

To provide more information about our Digital Super-8 Cartridge solution we publish the ‘bill of materials’. This is for the version with external module. Development is underway for a new prototype with no external module, it will have all electronics inside the cartridge.

Bill of materials:

The Cartridge: 3D printed Super8 cartridge, Ximea MU9-MBRD subminiature camera (with Aptina MT9P031 sensor), our own designed shutter sync circuit PCB with photodetector for film claw detection, microUSB breakout board with image capture indication LED, IR Filter, connector cable from PCB to microUSB board, high quality USB cable to connect cart to external module.

External module: Raspberry Pi3, 32GB SanDisk microSD card, Raspberry Pi touch screen with plastic casing, 6600 mAh power bank with microUSB cable to power the module.

Code: C++ application designed built on Qt Creator to control the capturing, settings, and to develop raw images into video, colorgrading.

New footage – birds and bunnies

We shot some new footage to test the quality of the Digital Super8 Cartridge. Our software app takes the RAW Bayer images of the cartridge and performs S-Log encoding before we do any further processing. Using the Digital Super8 application we added contrast with S-curve and then applied individual S-Curves on the RGB channels to add warmth. Because Digital Super8 consists of individually captured 12 bit RAW images (global shutter) there’s a lot of flexibility in how to process afterwards. One could do B&W, natural color, warm, cool or whatever else. Also the software provided allows for export of TIFF image format.

The Nizo 801 Macro we used has some motor instability, leading to a bit of flicker.

All electronics inside the Digital Super 8 Cartridge

We’ve got a working prototype of the Digital Super 8 Cartridge that runs with the Raspberry Pi 3 in an external module with touch screen. Benefits of that solution is the high level of control of operating the Digital Super 8 Cartridge and its settings through the touch screen. Plus the additional real-time monitoring of what is being filmed (in B&W) is a plus.

However the drawback is that the ‘filmtype viewing pane’ of the super 8 camera has to be knocked out of your camera in order to enable the USB connection from the cartridge to the external module.

Some people have suggested to us to try and fit all electronics into the cartridge. Clearly we had to find a smaller Single Board Computer than the Raspberry Pi. Ports and test with the NextThing Co. C.H.I.P. SBC failed as this single core ARM SBC is simply not powerful enough. Now our hopes are on the Orange Pi Zero, which sports a quad-core ARMv7 SOC in a tiny form factor. We have ported the software and the OPI Zero performs reasonably well. Great results for VGA and QHD resolutions. But we need to find optimisations in the code and push for the 720p to runs without dropping frames as well. Whether this will be at all possible we don’t know yet.

Orange Pi Zero inside the Digital Super 8 Cartridge

Benefits of this solution is that the Digital Super 8 Cartridge can simply be dropped into your camera and you don’t have to work with external module or screen. However the cartridge will have to provide a few buttons and LEDs for powering on/off and controlling settings. Alternatively we are looking at using VNC to provide connection via WiFi to your smartphone where you can then see the desktop of the Digital Super 8 cartridge and control its settings.

We are now waiting for the appropriate Lithium Polymer battery and boost/charge circuit and first need to get all the electronics really to fit within the cartridge. More to follow.

New Digital Super 8 footage


We managed to encode the RAW Digital Super 8 images with S-Log (following Sony’s algorithm). Then processing those with simple S-curve and tweaking colors, saturation and brightness/contrast a bit leads to great results, as show below:

Earlier (before we did S-Log encoding, only gamma encoding) we shot a few new samples with fully portable Digital Super 8.  Below a summer sky time lapse (1280 x 720)

and autumn colours in QHD:

and the the same capture rendered as Black & White. To demonstrate the power of Digital Super 8 cartridge shooting individual RAW images in 12 bit (!) bit depth. The Digital Super 8 software tools allow rendering and controlling RGB channels, color cast, saturation, contrast, brightness, HDR and fps.